Saturday, March 30, 2013

Baked Plantain Chips with Guacamole

Every time I buy bananas at the grocery store, I see the plantains sitting there and I'm intrigued. They're so often passed by, ignored in favor their smaller but far more popular cousin. Well just like in high school, popularity doesn't always equal greatness. Perhaps the plantain has more to bring to the (cafeteria) table than we all assume. Maybe like they'd add a new dimension to our palate just like the slightly-off emo musician who went on to be the 'star of his record label' hottie that the new crop of high school girls swoon over...

Ok I think I've officially beaten that metaphor to death. So anyway, I bought a plantain. And I had to decide what the heck to do with it. I had thought about making this recipe (which I still intend to try out one day.. do I smell a future blog post?) but when I found myself with a ripe avocado, I decided to go in a different direction - baked plantain chips and guacamole. 

I've had fried plantain before at restaurants but lacking a deep fryer (and fearing getting burnt by splattering oil), I decided to bake them, which results in a crunchy chip rather than the tender inside you'd find with a fried plantain. Equally delicious if you ask me. 

It's incredibly simple (as many of my recipes have been lately, perhaps a reflection of the fact that it's not the dead of winter anymore and there's more incentive to actually leave my apartment rather than stay in and cook all day...). Slice an unripe plantain into thin, equal slices. Place the slices onto a sprayed baking sheet, spray with olive oil, and season with salt, pepper, and chili powder. Put into a 375 degree preheated oven. After 15 minutes, flip the plantains. After an additional 5 minutes, test one of the chips. If it's sufficiently crunchy, remove. If not, pop it back in for just a few more minutes. 


While the chips cool, mix up your guacamole. Now everyone has their own preferences when it comes to guacamole, but I use ripe avocado, chopped red pepper, tomato, onion, jalapeno, and cilantro. I also mix in a squirt of lime juice and season with red pepper flakes, onion powder, garlic powder, salt, and pepper. And it's delicious. So delicious that I forgot to take a picture before digging in, hence the somewhat pathetic photography in this blog post. But there you have it: now you're ready to dig in!


Baked Plantain Chips with Guacamole

Plantain Chips:

Unripe plantain
Olive oil
Salt 
Pepper
Chili Powder

Slice plantain into equal pieces, approximately 1/4" thick. Spray with olive oil and season with spices. Bake 15 minutes. Flip. Bake another 5-10 minutes until desired crunchiness. 

Guacamole: 

Ripe avocado
Red pepper, diced
Tomato, diced
Onion, diced
Jalapeno, seeds and membrane removed (if desired) and finely diced
Lime juice
Red pepper flakes
Onion powder
Garlic powder
Salt
Pepper

Cut avocado in half and remove pit. Scoop out avocado into bowl. Mix in all other ingredients and mash with fork until desired texture. 

Tuesday, March 26, 2013

Wonton Hor D'Oureves: Taco Bites and Apple Cheesecakes

In need of a good hor d'oeuvre? Wonton wrappers to the rescue! I have done so many fun things with won ton wrappers -- from crab ragonnes to baked mozzarella sticks to sweet potato raviolis to your traditional chicken dumpling -- and I've never been disappointed. But wrapping up all those teeny tiny wontons can be time consuming and quite frankly, bit annoying. Solution? Wonton cups!


Simply insert the wonton into a mini muffin tin and bake to create a cup which  you can fill with any number of different options to make a cute little hor d'oeuvre. Or you can use a regular sized muffin tin and two wonton wrappers to create a larger cup for an appetizer or light meal - sized portion. I'm telling you -- people are really impressed by things that look fancy! Your dish may be incredibly tasty but its often the presentation that wins people over at potlucks. 

So what can you fill these cups with? I choose to do one savory -- taco dip -- and one sweet -- cinnamon cream cheese mixed with yogurt and topped with apples and walnuts. But the possibilities are virtually endless: spinach and artichoke dip; shrimp salad; strawberries and chocolate sauce with fresh mint; brie and jam; tomatoes, fresh mozzarella and basil; shredded steak with sautéed onions and peppers topped with provolone; pumpkin pie filling and a dollop of whipped cream... Have another idea? Share it in the comments!

If you choose to do one with cheese, I'd recommend popping the filled cups back into the oven under the broiler for a bit to melt the cheese as I did with my taco dip ones. Check out the recipes below for details.

And one last thing for today -- Happy Birthday Dad! (There's gotta be some benefits to having your own blog... getting to give personal shout outs is one of them!) 


Wonton Hor D'Oureves: Taco Bites and Apple Cheesecakes

Preheat oven to 375. Spray mini muffin tin. Press wrappers into muffin cavities. Bake for 5 minutes. Re-press wrappers into cups to make sure they are all "cup-shaped." Bake for another 3-4 minutes until hardened and light golden brown. 


Taco Bites: 

Put a small dollop of cream cheese into the bottom of the cup. Top with salsa and shredded cheddar. Bake until cheese is melted. 


Apple Cheesecakes: 

Before baking the cups, sprinkle with cinnamon and a bit of sugar. 

For each dozen cups, mix two triangles of Laughing Cow cinnamon cream cheese with 1/3 c of plain greek yogurt. Put small dollop into the bottom of the cup. Top with finely diced apple (granny smith works well) and chopped walnuts.

Friday, March 22, 2013

Two-Ingredient Oatmeal Cookies

These cookies will probably not be the best cookies you'll ever eat. So why, you might ask, am I posting them? Who starts a post with a statement like that? What kind of food blogger am I!? 

Well, I'm a time-strapped, health-conscious blogger who believes in the value of honesty and dessert. That's who I am, and that's why I'm posting this recipe. Because these cookies, while not mind-blowing, are certainly good, and incredibly easy, fast, and healthy. And when I recently whipped up a batch for some friends I had over to my apartment, they all disappeared from the plate within minutes. So I'd say they're worth sharing!
The two basic ingredients of these cookies are oats and very ripe bananas. Never, ever throw away over-ripe bananas -- there's SO many options for what you can do with them: smoothies, baked goods, "ice cream" (I'm sure I'll share this recipe at some point), etc. If you don't feel like doing something with them right away, just pop them in the freezer for later. Anyway, in addition to the oats and bananas, you can add essentially whatever you like to these cookies. I chose to add some cinnamon and a little salt (which I recommend) and then mixed in some walnuts and chocolate chips. Raisins or any other kind of dried fruit, pomegranate seeds, and peanut butter would probably all be delightful as well! 

The recipe couldn't be simpler: mix everything together and scoop "cookie" sized balls onto a baking sheet lined with parchment paper. Bake in a preheated 350 degree oven for about 15 minutes. And that's it! Serve warm, perhaps with some ice cream. Then have a handful of the leftovers with some yogurt and fruit for a tasty breakfast.


Two-Ingredient (plus mix-ins!) Oatmeal Cookies
(makes approximately 16 cookies)

1 c oats
2 very ripe bananas (small/medium)
2 tbsp chopped walnuts
2 tbsp chocolate chips
Sprinkle of salt
Dash of cinnamon

Preheat oven to 350 degrees. Mix everything together in a medium bowl. Scoop cookies onto baking sheet lined with parchment paper (or just spray your sheet well). Bake for 15 minutes.

Saturday, March 16, 2013

Roasted Eggplant with Tahini Yogurt Sauce and Crispy Chickpeas

Secret confession: When I made this dish, I scaled the proportions to what (according to the recipe) should have been two servings, assuming I'd have half for dinner and half for lunch the next day. Well I ate half of it... and then three-quarters... and finally just threw in the towel and devoured it all. It was that good. Plus hey, eggplant's good for you, right!? I did, however, have some of the tahini yogurt sauce leftover, which made a perfect dressing for a salad of spinach, tomatoes, cucumber, red pepper, onion, chickpeas, and feta (I just added in a tiny bit more water to it to thin it out). And I made extra crispy chickpeas which I used for a creative version of ants on a log: celery with garlic herb laughing cow cheese spread topped with crispy chickpeas.

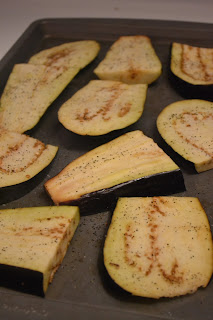
But on to the main attraction -- roasted eggplant with tahini yogurt sauce and crispy cumin chickpeas. Whenever I make eggplant, I cut it in the morning, sprinkle some salt on it and then press it in between paper towels while I'm at work. Supposedly this gets rid of any bitter taste the eggplant can have. Is it absolutely necessary? I'm not sure, but it's always resulted in delicious eggplant so I never want to risk it to find out what would happen if I didn't. In this case, the eggplant I had was quite large, so I cut in half and then sliced each half into slices about 3/4" thick.

When you're ready to start preparing the dish, the first thing you'll want to do is get your chickpeas in the oven to crisp up. If you only want enough chickpeas for the recipe, you can just do about 2/3 of the can, but these suckers are a delicious snack, so I'd recommend just doing the whole thing. Spray (or toss) generously with olive oil and then sprinkle on cumin, salt, and pepper. Roast for about 30-35 minutes at 425 degrees until nice and crispy.

As soon as you get the chickpeas in the oven, prep your eggplant. Spray the eggplant with olive oil (you shouldn't need anymore salt if you pre-pressed the eggplant) and pop that in the oven as well, roasting for 30 minutes, flipping once halfway through. 

While the chickpeas and eggplant are roasting, you can mix the sauce. Combine plain greek yogurt, tahini (which is sesame paste; most grocery stores carry it but if you can't find it check your local health food store), garlic, and lemon juice. Then slowly stir in water until the sauce is your desired consistency (you want it thick enough that you can dollop it on to the eggplant without it running off the sides). For me, this was about 1.5 tablespoons. 

After your eggplant is done roasting, top each slice with a generous amount of yogurt tahini sauce, several crispy chickpeas, and a sprinkle of parsley. Mmm mmm mmm... another winner inspired by the Smitten Kitchen cookbook! Consider making this amazing recipe as a vegetarian option for Lent or Meatless Monday or use it as a side dish if you want a heartier meal. 


Roasted Eggplant with Tahini Yogurt Sauce and Crispy Cumin Chickpeas
(Makes 1 large serving; 2-3 side dish servings)

1 large eggplant, halved and then cut into 3/4 inch slices
3/4 tsp garlic
1/4 c yogurt
1.5 tbsp tahini
1 tbsp lemon juice
1.5 tbsp water
2/3 can of chickpeas
Cumin
Salt and pepper, to taste
Olive oil
Parsley

Press salted eggplant slices in between paper towels for at least 20 minutes. Preheat oven to 425. Spray or toss chickpeas with olive oil and sprinkle with salt, pepper, and cumin. Roast approximately 30-35 minutes until crispy. 

Lightly spray or drizzle eggplant with olive oil. Roast for 25-30 minutes, flipping once halfway through. 

Mix yogurt, tahini, and lemon juice. Slowly add water until you've reached the desired consistency. 

Assemble by topping each eggplant slice with a dallop of tahini yogurt sauce, several chickpeas, and parsley. Sprinkle with salt and pepper if desired. 

Monday, March 11, 2013

Homemade Granola

Back in high school and college, cereal was pretty much my breakfast of choice everyday. My all time favorite has got to be raisin nut bran but I'm also a big fan of banana nut crunch, the mini wheats with fruit inside, apple cinnamon cheerios, great grains... yea, I like a lot of cereals. But nowadays, I don't eat it nearly as much simply because I find that whenever I have cereal for breakfast, I can barely make it to my 10 AM meeting without my stomach growling... I need more substantial and nutritious breakfasts to start off my day. 

One of my go-to breakfast is plain Greek yogurt and a drizzle of honey topped with lots of fruit and granola. The protein from the yogurt plus the vitamins in the fruit help start my day off right and granola helps fill me up while adding some delicious crunch to the mix. You have to be a bit careful with granola though. Sometimes it's sneakily not so good for you, loaded with sugar and empty calories. While there are plenty of good choices on the market out there, I've also been toying around with the idea of making my own for a while now, and the other day I finally took a stab at it. While I would tweak it a bit next time around (which I'll write about below), I think it turned out well! And the possibilities for customizing this recipe are endless so I'll definitely be making my own granola again! 

The basic parts of granola are the dry base (this makes up the majority of the recipe, generally oats and sometimes other grains), mix-ins (most often dried fruits and nuts but feel free to get creative), a sweetener (brown sugar, honey, agave, maple syrup, etc.), and some sort of liquid binder to hold everything together (sometimes the sweetener pulls double duty and also acts as the binder). 


Because I'm obsessed with peanut butter, I wanted to try giving my granola a hint of a peanut butter taste, which I thought would pair nicely with maple flavor as a sweetener. I also had some extra Kashi seven grain cereal that I found to be a bit bland on its own but worked perfectly to bulk up this granola, so that's where my recipe began.

First, preheat the oven to 375 degrees. In a medium/large bowl, combine oats with the puffed grain (if you don't want to go out and buy Kashi just for this recipe, just sub in another similar cereal or double the oats) and add-in your nuts. Now at this point, I also added in my dried fruit -- golden raisins and chopped dates. However, while the raisins held up just fine in the oven, some of the smaller pieces of dates got burnt and I ended up having to pick them out by hand and throw them away. So I'd suggest putting in the raisins but holding off on the dates and adding them in a few minutes before the granola is done. If you decide to use another dried fruit mix-in such as apricots, bananas, apples, cranberries, etc., just do a quick google search to see how it will hold up in the heat to decide whether to add now or later. Of course chocolate chips would also make a delicious (if not quite as nutritious) mix-in but that you obviously wouldn't add until the granola is done and completely cool.

For the liquid binder, I whisked together peanut butter and water and poured this over the dry ingredients along with the maple syrup I used as my sweetener. My syrup was sugar free and relatively thin. If yours is thicker, you may want to use less so its not too sweet and increase the amount of water you use. 

Now just spread your mixture out on a baking sheet lined with parchment paper or wax paper, keeping some clusters but breaking up any really large clumps so it cooks evenly. Sprinkle on some cinnamon and put it in the oven, stirring every 5-10 minutes. My granola was done in about 20 minutes - nice and toasted and yummy! Store in an airtight container or a ziplock bag with all the air squeezed out of it so it stays fresh. 

One last thing for today: a quick product review/shout out about these Barry's Bakery French Twists. I randomly came across these in the health food aisle of my grocery store and decided they'd be my impulse buy for the day. I'm really quite impressed! They contain no butter, eggs, yeast, or dairy so naturally, they've got to be gross right? Wrong -- these babies are good! They taste kind of like a lighter churro. They're great on their own, but I've also broken them up and sprinkled on top of yogurt for a healthy snack. If you're looking for more of a treat, you could pair them with frozen yogurt or dip in chocolate sauce. There's several flavors but so far I've only tried the original cinnamon kind. You'll have to let me know if you try another!


Homemade Granola

1 c. oats
1 c. puffed cereal (such as Kashi 7 Whole Grain Cereal Puffs) 

1 tbsp almonds, chopped
2 dates, chopped

1.5 tbsp golden raisins
1.5 tbsp peanut butter 

3.5 tbsp water
3 tbsp sugar free maple syrup 
Cinnamon

Preheat oven to 375 degrees. 


Combine oats, puffed cereal, nuts, and golden raisins. In small bowl, whisk together peanut butter and water. Pour peanut butter mixture and maple syrup over dry ingredients while stirring. 

Spread granola on baking sheet covered with wax or parchment paper. Sprinkle on some cinnamon to taste. Bake for 15 minutes, stirring halfway through. Add in dates and bake for another approximately 5 minutes until toasted. 

Friday, March 8, 2013

Grilled Bok Choy

Whenever I'm out at the grocery store and I come across a fruit or vegetable I've never made before, I consider it a personal challenge. It's pretty much a guarantee that I will buy it and immediately go home and look up a million recipes. A few weeks ago, this happened with a persimmon. A what?! It's a Chinese fruit that's really soft when ripe. When I tasted it, I found it to be really sweet, so I ended up putting it on crackers with cream cheese to tone down the sweetness with the salty cracker; turned into a most delicious snack. This happened again with parsnips, hence the parsnip fries and rosemary parsnip puree. Most recently, it was baby bok choy that caught my eye! 

If you've never tried bok choy, I highly recommend you hunt some down. Also of Chinese origin, it's kind of like cabbage and is full of vitamins! And I think grilling it is definitely the way to go. It resulted in a tender yet still crunchy texture with a crispy top, mmm mmm! 

Start by trimming off the very bottom of the vegetable, but don't cut off too much -- you want it to still be intact. My bok choy was of the baby variety so it was quite small. A few of the larger ones, I cut in half lengthwise, but the others I left as is. However, if you have the regular-sized ones, you'll want to cut them all in half so they cook all the way through. Spray or lightly drizzle the bok choy with olive oil; you don't need much or it will get oily. Then toss with seasoned salt, paprika, garlic powder, and pepper. I also put some Mrs. Dash on there, but if you don't have any, I'm sure it'll still taste fine without it. Now just toss them right on the grill on medium heat. 

Grill for about five minutes until there's grill marks on there. Then flip, and grill for another five minutes or so. This may take longer if you're not using baby bok choy. Just keep an eye on it so the tops don't get too burnt. I like it best when the bottom white/light green part is tender but still crunchy. 

And that's it! Super simple and super tasty! I used this as a side to go along with some cured salmon on toast with cream cheese, a recent obsession of mine. But bok choy could really go with anything; feel free to experiment: change up the spices or brush with some soy sauce, balsamic vinegar, or even sriracha. If you find something you like, leave a comment so we can all try it out! 


Grilled Bok Choy

Bok choy
Paprika
Seasoned salt
Garlic powder
Pepper
Mrs. Dash
Olive oil

Preheat grill to medium. Trim white end of bok choy and slice large ones in half lengthwise. Spray with olive oil and toss with spices to taste. Grill approximately 5 minutes. Flip and grill another approximately 5 minutes. 

Wednesday, March 6, 2013

Lime-Cilantro Shrimp and Couscous Foil Packets with Mango-Avocado Salsa


Guest Blogger: Camille Wingo


Janna has most graciously allowed me to do a guest post for Gourmet, My Way.  For anyone who doesn’t know me, I’m Janna’s roommate from Memphis, TN, so my favorite dishes typically come in casserole format and are covered in cheese. A few weeks ago, Janna blogged about hosting Bachelor Night, and this past week was my turn to host. Because of Janna’s newfound interest in seafood and another close friend’s lactose intolerance, I’ve decided to highlight my absolute favorite thing to make: Shrimp Pockets!  This is a recipe introduced at one of our Bachelor viewing parties several years ago by Lauren Dyer.  It was inspired by one in a Self Magazine e-newsletter, but has sense been tweaked and incorporated into everyone’s rotation of healthy and yummy dinner options.


Step One:  Marinate the shrimp.
Run the frozen shrimp under cold water to defrost.  Toss shrimp with olive oil, cilantro leaves, the juice of one lime, salt, and pepper to marinate.


Step Two: Assemble foil packets.
Combine 2 cups of dry couscous with 1 cup of water in a measuring cup and stir until it becomes a wet sand consistency.  Pull out about 18 inches of foil for each packet.  Take a LARGE handful of fresh spinach leaves and place in the middle of the foil packet.  Cover with 3/4 cup of the couscous/water mixture, and top with 1/4 of the marinated shrimp.  Roll up all four sides so that the foil packet is enclosed.  Repeat with other 3 foil packets and pop in the oven at 375 degrees.  Bake for 20-25 minutes until shrimp are all pink.  (Alternative cooking method: these foil packets can also be placed on the grill over medium-high heat for about 15-20 minutes until shrimp are fully-cooked.)


Step Three: Prepare the salsa.
While the foil packets are baking, chop the mango, red pepper, avocado, and red onion into small pieces.  Stir in the juice of one lime, remaining cilantro, and finely chopped jalapeno.  Add salt and pepper to taste.


Step Four: Enjoy.
Once the foil packets are ready, scrape the contents onto a plate (or eat directly from the foil packet for easy clean-up) and top with a plentiful amount of salsa.  Enjoy your delicious and healthy meal, have a glass of wine, and watch the newest episode of the Bachelor or the Bachelorette with a good group of friends!


Lime-Cilantro Shrimp and Couscous Foil Packets with Mango-Avocado Salsa
(makes 4 servings) 

1 pound frozen shrimp, shelled and deveined
1 bunch of fresh cilantro, divided into two parts
3 tablespoons olive oil
1 large mango, peeled and diced
2 medium ripe avocados, diced
½ red onion, diced
1/2 jalapeño pepper, seeded and finely chopped
2 limes
1 bag fresh baby spinach leaves
2 cups uncooked couscous
1 cup water
Salt and pepper
Lots of tin foil

Toss defrosted shrimp with olive oil, half the cilantro, juice of one lime, salt, and pepper to marinate. 

Mix uncooked couscous with water. Place large handful of fresh spinach in the middle of a piece of foil. Top with 3/4 c of couscous and 1/4 of the shrimp. Wrap foil so all sides are enclosed. Bake in 375 degree oven for 20-25 minutes until shrimp is cooked. 

Mix avocado, mango, red onion, jalapeno, juice of one lime, half the cilantro, and salt and pepper to taste. Top contents of the shrimp pocket with the avocado-mango salsa. 

Saturday, March 2, 2013

Chocolate Chip Red Velvet Cupcakes with Nutella Cream Cheese Frosting

I've got a yummy one for you all today! Despite the fact that I eat dessert pretty much every single night, I noticed that this blog has a definite lack of recipes to satiate your sweet tooth. So we will just have to fix that, won't we?! 

These cupcakes are delicious and easy! I made them for my friend's birthday, so I made a few big ones for her and a bunch of little ones for people to snack on at the party. And of course, brightly colored sprinkles were necessary! 

I used a cake mix for this, which some might call cheating. I, on the other hand, call it time management :) While I'm certainly capable of baking from scratch, it's also nice to have some quicker recipe options. However, I did use some swaps in place of the oil and eggs to make it a little healthier... and then proceeded to essentially cancel that out by icing them with nutella cream cheese frosting, mmmm! But this was a celebration, and special occasions call for special desserts! 

To make, combine red velvet cake mix -- I used Duncan Hines Signature Red Velvet -- with plain greek yogurt, egg whites, and water. Then mix in some chocolate chips (optional, but suggested!). Pour into cupcake liners and bake in a 350 degree pre-heated oven until a toothpick comes out clean. For my full-sized cupcakes, which I filled quite generously, this was 27 minutes. For the baby ones made in the mini-muffin tin, it was 15 minutes. 


For the icing, beat together 6 oz of room temperature cream cheese (reduced fat or regular; not fat free), powdered sugar, milk, and nutella. Make sure your cupcakes are completely cooled before you ice or you'll end up with a mess. Be sure to top with something fun: rainbow sprinkles, mini chocolate chips, crushed oreos, chocolate shavings... whatever your fancy!


Chocolate Chip Red Velvet Cupcakes with Nutella Cream Cheese Frosting 
(makes 16 large and 24 little cupcakes)

Cake: 
1 box of red velvet cake mix (18.25 oz)
6 oz plain greek yogurt
1 1/3 c. water
2 egg whites
1/2 c. chocolate chips


Icing: 
6 oz cream cheese, room temp
1 1/2 c. powdered sugar
1 tbsp milk
2 tbsp nutella

Preheat oven to 350 degrees. Mix together cake mix, greek yogurt, water, and egg whites. Mix in chocolate chips. Pour into cupcake liners or a sprayed cupcake tin. Bake until toothpick comes out clean (use instructions on the back of the box as a guide for how long this will take). Cool completely. 

Whip together cream cheese, powdered sugar, milk, and nutella. Spread atop cupcakes.