Showing posts with label Side Dish. Show all posts

Tuesday, April 16, 2013

Spinach and Garbanzo Bean Tapas


¡Delicioso! ¡Sabroso! ¡Mmm! Google translate tells me that's Spanish for Delicious! Tasty! Yum! All words that describe this Spanish dish, not to mention hearty and healthy. What more could you ask for?

Well, it's quite versatile as well. The original Smitten Kitchen recipe suggests serving it as a tapas with toasted bread (pita bread or chips would work too!). I have quite the affinity for tapas so that is certainly not a bad option! But you could also use it as a side dish, laying the foundation for a protein of your choice. Or serve it on top of a bed of spinach with some feta cheese for a light lunch. 


I followed the recipe fairly closely with this one, and I will warn you, it is a 
somewhat time consuming recipe. But plan to make extras so that you'll have some leftovers and it'll definitely be worth your effort, I promise. So grab your maracas and pour yourself (and me!) a glass of sangria because we're ready to party!

On a different note, I wanted to explain why my posts have slowed down just a bit lately... for those of you who don't already know, I'm going on a mission trip to Thailand in just over 6 weeks! (For more info, check out my site.) Fundraising, researching, planning, and preparing for this trip has taken over a good chunk of my free time. But I'm still committed to posting regularly so stick with me! Plus, one of the things I'm considering doing while over there is taking a cooking class, so I'll definitely have at least one amazing Thai food recipe for you at the end of all this. So get excited -- I know I am!! 


Spinach and Garbanzo Bean Tapas
(very mimimally adapted from Smitten Kitchen)

2 15oz cans of chickpeas, drained
4-5 tbsp olive oil
Large bag (11oz) of spinach
1 large slice of hearty bread, cubed
1/2 cup tomato sauce
3 cloves of garlic, minced
1 tsp cumin
1 tsp smoked paprika
1 1/2 tbsp red wine vinegar
Salt, pepper, red pepper flakes to taste
Lemon juice, to taste

Heat 2 tablespoons of olive oil in a large pan. Add spinach and a pinch of salt and stir. Cook until tender and then set aside. 

Heat 2 more tablespoons of oil and toast the cubed bread until golden brown on all sides. Add cumin, salt, pepper, red pepper flakes, and garlic. If needed, add another tablespoon of oil. Cook for another minute.

In a food processor, blend toasted bread with vinegar until it forms a paste. Return to the pan and mix in chickpeas and tomato sauce. Stir until warmed through and season with salt and pepper to taste. Add in spinach and stir again. If the consistency is too thick, slowly add a little bit of water. 

Top with smoked paprika and serve as you please! 

Saturday, March 16, 2013

Roasted Eggplant with Tahini Yogurt Sauce and Crispy Chickpeas

Secret confession: When I made this dish, I scaled the proportions to what (according to the recipe) should have been two servings, assuming I'd have half for dinner and half for lunch the next day. Well I ate half of it... and then three-quarters... and finally just threw in the towel and devoured it all. It was that good. Plus hey, eggplant's good for you, right!? I did, however, have some of the tahini yogurt sauce leftover, which made a perfect dressing for a salad of spinach, tomatoes, cucumber, red pepper, onion, chickpeas, and feta (I just added in a tiny bit more water to it to thin it out). And I made extra crispy chickpeas which I used for a creative version of ants on a log: celery with garlic herb laughing cow cheese spread topped with crispy chickpeas.

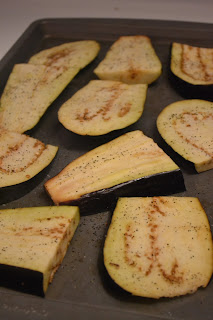
But on to the main attraction -- roasted eggplant with tahini yogurt sauce and crispy cumin chickpeas. Whenever I make eggplant, I cut it in the morning, sprinkle some salt on it and then press it in between paper towels while I'm at work. Supposedly this gets rid of any bitter taste the eggplant can have. Is it absolutely necessary? I'm not sure, but it's always resulted in delicious eggplant so I never want to risk it to find out what would happen if I didn't. In this case, the eggplant I had was quite large, so I cut in half and then sliced each half into slices about 3/4" thick.

When you're ready to start preparing the dish, the first thing you'll want to do is get your chickpeas in the oven to crisp up. If you only want enough chickpeas for the recipe, you can just do about 2/3 of the can, but these suckers are a delicious snack, so I'd recommend just doing the whole thing. Spray (or toss) generously with olive oil and then sprinkle on cumin, salt, and pepper. Roast for about 30-35 minutes at 425 degrees until nice and crispy.

As soon as you get the chickpeas in the oven, prep your eggplant. Spray the eggplant with olive oil (you shouldn't need anymore salt if you pre-pressed the eggplant) and pop that in the oven as well, roasting for 30 minutes, flipping once halfway through. 

While the chickpeas and eggplant are roasting, you can mix the sauce. Combine plain greek yogurt, tahini (which is sesame paste; most grocery stores carry it but if you can't find it check your local health food store), garlic, and lemon juice. Then slowly stir in water until the sauce is your desired consistency (you want it thick enough that you can dollop it on to the eggplant without it running off the sides). For me, this was about 1.5 tablespoons. 

After your eggplant is done roasting, top each slice with a generous amount of yogurt tahini sauce, several crispy chickpeas, and a sprinkle of parsley. Mmm mmm mmm... another winner inspired by the Smitten Kitchen cookbook! Consider making this amazing recipe as a vegetarian option for Lent or Meatless Monday or use it as a side dish if you want a heartier meal. 


Roasted Eggplant with Tahini Yogurt Sauce and Crispy Cumin Chickpeas
(Makes 1 large serving; 2-3 side dish servings)

1 large eggplant, halved and then cut into 3/4 inch slices
3/4 tsp garlic
1/4 c yogurt
1.5 tbsp tahini
1 tbsp lemon juice
1.5 tbsp water
2/3 can of chickpeas
Cumin
Salt and pepper, to taste
Olive oil
Parsley

Press salted eggplant slices in between paper towels for at least 20 minutes. Preheat oven to 425. Spray or toss chickpeas with olive oil and sprinkle with salt, pepper, and cumin. Roast approximately 30-35 minutes until crispy. 

Lightly spray or drizzle eggplant with olive oil. Roast for 25-30 minutes, flipping once halfway through. 

Mix yogurt, tahini, and lemon juice. Slowly add water until you've reached the desired consistency. 

Assemble by topping each eggplant slice with a dallop of tahini yogurt sauce, several chickpeas, and parsley. Sprinkle with salt and pepper if desired. 

Friday, March 8, 2013

Grilled Bok Choy

Whenever I'm out at the grocery store and I come across a fruit or vegetable I've never made before, I consider it a personal challenge. It's pretty much a guarantee that I will buy it and immediately go home and look up a million recipes. A few weeks ago, this happened with a persimmon. A what?! It's a Chinese fruit that's really soft when ripe. When I tasted it, I found it to be really sweet, so I ended up putting it on crackers with cream cheese to tone down the sweetness with the salty cracker; turned into a most delicious snack. This happened again with parsnips, hence the parsnip fries and rosemary parsnip puree. Most recently, it was baby bok choy that caught my eye! 

If you've never tried bok choy, I highly recommend you hunt some down. Also of Chinese origin, it's kind of like cabbage and is full of vitamins! And I think grilling it is definitely the way to go. It resulted in a tender yet still crunchy texture with a crispy top, mmm mmm! 

Start by trimming off the very bottom of the vegetable, but don't cut off too much -- you want it to still be intact. My bok choy was of the baby variety so it was quite small. A few of the larger ones, I cut in half lengthwise, but the others I left as is. However, if you have the regular-sized ones, you'll want to cut them all in half so they cook all the way through. Spray or lightly drizzle the bok choy with olive oil; you don't need much or it will get oily. Then toss with seasoned salt, paprika, garlic powder, and pepper. I also put some Mrs. Dash on there, but if you don't have any, I'm sure it'll still taste fine without it. Now just toss them right on the grill on medium heat. 

Grill for about five minutes until there's grill marks on there. Then flip, and grill for another five minutes or so. This may take longer if you're not using baby bok choy. Just keep an eye on it so the tops don't get too burnt. I like it best when the bottom white/light green part is tender but still crunchy. 

And that's it! Super simple and super tasty! I used this as a side to go along with some cured salmon on toast with cream cheese, a recent obsession of mine. But bok choy could really go with anything; feel free to experiment: change up the spices or brush with some soy sauce, balsamic vinegar, or even sriracha. If you find something you like, leave a comment so we can all try it out! 


Grilled Bok Choy

Bok choy
Paprika
Seasoned salt
Garlic powder
Pepper
Mrs. Dash
Olive oil

Preheat grill to medium. Trim white end of bok choy and slice large ones in half lengthwise. Spray with olive oil and toss with spices to taste. Grill approximately 5 minutes. Flip and grill another approximately 5 minutes. 

Saturday, February 16, 2013

Zucchini Ribbons with Toasted Almond Pesto


So I might be the only 25 year old who asked for a cookbook, a tea infuser, and Good Housekeeping magazine on her Christmas list... (Don't worry, I'm not a total grandma; I also had a new bell for my bike and trapeze lessons on there). Lucky me, Santa brought me a few of these requests, one of which was the cookbook -- the Smitten Kitchen cookbook to be exact. You've heard me talk about my love for Deb Perelman before, so it may not surprise you to learn I spent a good hour or so of my Christmas day paging through each and every recipe of the book. Almost every page turn was met by an "oohh," "ahhh," or "wow that looks good."

This was one of those recipes. I followed it pretty closely, making only a few slight adaptations, and was definitely pleased with the results. I really loved the taste of the toasted almonds, which was complemented perfectly by the parmesan cheese. Additionally, the texture and the nutty flavor of the pesto paired very nicely with the delicateness of the zucchini ribbons.  

First, you toast almonds in the oven for approximately 15 min at 350 degrees. After they've cooled slightly, put them in a food processor with grated parmesan, garlic, salt, and red pepper flakes and puree until fine. Then mix in the lemon juice and olive oil to make a pesto. 

Using a mandolin grater (or verrrrry carefully by hand), slice the zucchini into thin long strips. Coat the strips with the pesto by dolloping on a little at a time and mixing until the zucchini is coated.  Not going to lie, I ended up using my hands here.

A word of warning - make sure you're ready to serve immediately when you do this. I let mine sit for a little while I finished prepping the rest of my meal, and the moisture from the zucchini watered down the pesto a bit and the almonds weren't quite as crunchy. This dish would make an impressive first course for a dinner party, or you can do what I did and serve it with grilled ham over parsnip puree!


Zucchini Ribbons with Toasted Almond Pesto
(Minimally adapted from The Smitten Kitchen Cookbook; serves 1 generously, 2 as a modest starter or side)

1 medium zucchini
6 almonds
1 tbsp grated parmesan cheese
Pinch of red pepper flakes
Pinch of salt
1 garlic clove
1 tbsp olive oil
1 tsp lemon juice

Toast almonds in 350 degree oven for 15 minutes. Grind in food processor with parmesan cheese, red pepper flakes, salt, and garlic until fine. Mix in olive oil and lemon juice. 

Slice zucchini into long, thin strips. Coat with almond pesto. Serve immediately. 

Wednesday, February 13, 2013

Grilled Ham with Rosemary Parsnip Puree


Just a quickie post for you today - grilled ham over rosemary parsnip puree. Or in reality, it's just a recipe for rosemary parsnip puree because the ham recipe is as follows: Grill. Eat. ;)

Anyway, this puree tastes rich, almost like it has quite a bit more butter in it than it actually does. I'm excited to try mixing some parsnips into mashed potatoes or mashed cauliflower to see if it adds that same flavor.

All you have to do is peel the parsnip and slice into pieces that are about 1/2" thick. Place in a covered dish and microwave for about three minutes until soft. Put the parsnips in a food processor with the milk and butter (or if you don't have a food processor, you could use a hand mixer or potato masher). Blend until smooth; you may choose to add more milk if you'd like a thinner texture like a more traditional puree but I liked it on the thicker, heartier side. Finally, mix in the spices, spread on the plate, and top with the grilled ham.


Grilled Ham with Rosemary Parsnip Puree

1 medium parsnip, peeled
1/4 - 1/2 tsp butter 
2 1/2 tbsp milk
1/4 tsp dried rosemary
1/4 tsp salt
1/4 tsp garlic powder

Slice parsnip into 1/2" slices and place in covered dish. Microwave for 3 minutes until soft. Put into food processor with milk and butter. Pulse until smooth. Add more milk if thinner texture is desired. Mix in spices. Spread on plate and top with grilled ham. 

Sunday, January 27, 2013

"Healthified" Chicken Fingers and Fries (with Garlic Mayo Aioli)

One of my favorite things to do when I cook is come up with sneaky little ways to make recipes healthier and more nutritious. This can mean adding in some cauliflower puree to mashed potatoes, using cottage cheese to create an alfredo sauce, making ice cream out of frozen bananas, or adding black bean puree to brownies (though I'll admit, that last one turned out pretty gross and I'm still in search of a tasty black bean brownie recipe so please share if you have one!). I get a weird satisfaction out of revealing the "secret" of these recipes to unsuspecting eaters. Although this particular recipe isn't as "out there" as some of the ones I've made in the past, I figured it was best to ease you guys into things... 


A few days ago, I had a craving for chicken fingers and so I decided to make a "healthified" version of the basic comfort meal of chicken fingers and fries. The chicken fingers are baked rather than fried, and the "fries" are actually parsnips! I don't know about you, but I hadn't previously eaten parsnips very often; in fact, I'm not sure I ever actually purchased one before. But sliced in the shape of a fry and baked in the oven under high heat, these babies were soft on the inside and slightly crispy on the outside, making them a great swap for potatoes with added nutrition. 

The key to the chicken fingers was to soak them in buttermilk. This makes them incredibly moist inside. I used dry buttermilk mix because it's easier than trying to use up a whole thing of buttermilk before it spoils. I cut the chicken into tender-sized pieces in the morning and let them soak in the buttermilk while I was at work. Because I'm indecisive, I decided to make two different kinds of chicken fingers. Both were breaded in panko (breadcrumbs would work too if you don't have any panko), but for half of them, I mixed in grated parmesan cheese and a variety of other seasonings to create an Italian flavor profile. For the other half, I mixed in shredded coconut and some spices for a "sweet and spicy" taste. 

After soaking the chicken, you'll dip each piece into the panko and spices mix
So many spices!
and place on a sprayed cookie sheet. Spray the chicken with olive oil using a Misto (or if you don't have one, just lightly drizzle it with olive oil or in a real pinch, spray with cooking spray; you need something on it though or it won't get crispy). Put into an oven preheated for 425 degrees. When the
Ready to take out of the oven
breading starts to get light brown and crispy, flip the chicken over and put it back into the over. Remove
when the other side is brown as well. I ended up baking them 7 minutes on the first side and 9 minutes on the other, but it will depend on the size of your tenders. To be safe, you can cut into one to make sure there's no pink inside. 


For the "fries," peel the parsnips and cut into the shape of fries, approximately four inches in length. Try your best to make them equal in size, especially in width. Because of the shape of my parsnips, some were thick on top and thin on the bottom, so they didn't all cook evenly. Next time, I'd shave more off of them
Here's what they look like when done
to make them uniform. You could always save any leftover pieces that don't make good fries to cook and puree or just eat raw. Anyway, place onto a sprayed cookie sheet and spray or lightly toss with olive oil. I used this recipe as a guide, so I seasoned mine with rosemary, garlic, cumin, salt and pepper, but if you don't care for those flavors, season as you please! I baked these for about 16 minutes until they started to brown on all sides, flipping them halfway through, but again, exactly cooking size will vary based on the size of your fries. Because I wanted to save time, I started these at 450 for a few minutes but then cheated and cooked them the rest of the way at 425 so I could put the chicken in at the same time, but if you're making them on their own, you'll want to stick to the higher heat so they get crispier.


I am a condiment fiend, so I served my chicken fingers and fries with ketchup, BBQ sauce, a coconut mango sauce, and a garlic mayo aioli. While many people find it revolting, I adore fries dipped in mayo, so personally, the aioli was my favorite sauce for the parsnips. I also preferred the ketchup with the Italian chicken fingers and the BBQ sauce with the coconut chicken. If you try the recipe, let me know your favorites! The recipes below make enough for 2 large or 3 moderate portions.


Baked Chicken Fingers

12-14 oz. boneless, skinless chicken breast
1 c. of buttermilk
Olive oil spray

For Italian seasoning: 
1/4 heaping c. panko
1 tbsp grated parmesean
Garlic powder, onion powder, red pepper flakes, parsley, oregano, salt, pepper to taste

For Coconut chicken: 
1/4 heaping c. panko
1 tbsp shredded coconut 
Garlic powder, chili powder, ginger, salt, red pepper flakes to taste

Cut the chicken breast into tender-sized pieces, approximately 1" x 4". Soak chicken tenders in buttermilk for at least an hour.  

Preheat oven to 425 degrees. Mix the panko and Italian spices in one bowl and the panko and coconut spices in another. If you choose to do all one type of chicken tender, double the measurements. 

Remove chicken from buttermilk and roll in the breading. Place onto a sprayed cookie sheet. Spray the chicken with olive oil. Place in the oven and bake for approximately 8 minutes. Flip and place back in the oven for another 8 minutes or until the chicken is light brown and crispy on both sides. 


Parsnip Fries   

5 parsnips, peeled
Olive oil spray
1.5-2 tbsp dried rosemary
Garlic powder, cumin, salt and pepper to taste 

Preheat the oven to 450 degrees. Chop the parsnips into the shape of fries, approximately 1/2" x 4" and place on sprayed cookie sheet. Spray with olive oil and sprinkle with spices. Bake for approximately 8 minutes, flip, and bake for another 8 minutes until they begin to brown. 


Garlic Mayo Aioli 
2 tbsp light mayo (don't use fat free) 
1 tsp lemon juice
Hefty sprinkle of garlic powder (or you can sub minced garlic)
Salt and pepper to taste

Mix and enjoy!