Showing posts with label Sauces and Dips. Show all posts

Saturday, March 30, 2013

Baked Plantain Chips with Guacamole

Every time I buy bananas at the grocery store, I see the plantains sitting there and I'm intrigued. They're so often passed by, ignored in favor their smaller but far more popular cousin. Well just like in high school, popularity doesn't always equal greatness. Perhaps the plantain has more to bring to the (cafeteria) table than we all assume. Maybe like they'd add a new dimension to our palate just like the slightly-off emo musician who went on to be the 'star of his record label' hottie that the new crop of high school girls swoon over...

Ok I think I've officially beaten that metaphor to death. So anyway, I bought a plantain. And I had to decide what the heck to do with it. I had thought about making this recipe (which I still intend to try out one day.. do I smell a future blog post?) but when I found myself with a ripe avocado, I decided to go in a different direction - baked plantain chips and guacamole. 

I've had fried plantain before at restaurants but lacking a deep fryer (and fearing getting burnt by splattering oil), I decided to bake them, which results in a crunchy chip rather than the tender inside you'd find with a fried plantain. Equally delicious if you ask me. 

It's incredibly simple (as many of my recipes have been lately, perhaps a reflection of the fact that it's not the dead of winter anymore and there's more incentive to actually leave my apartment rather than stay in and cook all day...). Slice an unripe plantain into thin, equal slices. Place the slices onto a sprayed baking sheet, spray with olive oil, and season with salt, pepper, and chili powder. Put into a 375 degree preheated oven. After 15 minutes, flip the plantains. After an additional 5 minutes, test one of the chips. If it's sufficiently crunchy, remove. If not, pop it back in for just a few more minutes. 


While the chips cool, mix up your guacamole. Now everyone has their own preferences when it comes to guacamole, but I use ripe avocado, chopped red pepper, tomato, onion, jalapeno, and cilantro. I also mix in a squirt of lime juice and season with red pepper flakes, onion powder, garlic powder, salt, and pepper. And it's delicious. So delicious that I forgot to take a picture before digging in, hence the somewhat pathetic photography in this blog post. But there you have it: now you're ready to dig in!


Baked Plantain Chips with Guacamole

Plantain Chips:

Unripe plantain
Olive oil
Salt 
Pepper
Chili Powder

Slice plantain into equal pieces, approximately 1/4" thick. Spray with olive oil and season with spices. Bake 15 minutes. Flip. Bake another 5-10 minutes until desired crunchiness. 

Guacamole: 

Ripe avocado
Red pepper, diced
Tomato, diced
Onion, diced
Jalapeno, seeds and membrane removed (if desired) and finely diced
Lime juice
Red pepper flakes
Onion powder
Garlic powder
Salt
Pepper

Cut avocado in half and remove pit. Scoop out avocado into bowl. Mix in all other ingredients and mash with fork until desired texture. 

Sunday, February 3, 2013

Roasted Cauliflower Yogurt Dip and Homemade Tortilla Chips


With just four ingredients plus a handful of spices, this roasted cauliflower yogurt dip is so simple and quite healthy, yet tasty enough to impress a crowd. As I mentioned in my last post, I served this as an appetizer for Chicken Tikka Masala so I adjusted the seasonings a bit from the inspiration recipe to complement the flavors of my meal. Based on the fact that we were scrapping the last specks of the dip from bowl before the last guest even arrived, I'd say it was a success! 

I served with the world's simplest homemade tortilla chips which I've made three times again since! A few months ago, I was walking through Bed, Bath, and Beyond to purchase a birthday gift when one of those aisle stands meant to seduce vulnerable shoppers caught my eye... I fell into the trap and walked out of the store with a microwave chip maker. Luckily in this case, that $20 impulse purchase was totally worth it! I've used it to make potato chips, zucchini chips, apple chips, you name it. But tortilla chips may be my new favorite! All you do is use a pizza cutter to cut up a tortilla, place the pieces on the chip maker, microwave for one minute, flip, and put it back in for another 30 seconds. That's it! No oil, no spray, no nothing. They come out so crispy, I almost wouldn't believe it if I hadn't done it myself! Not to worry if you don't have one of these magic chip makers... you can also make baked tortilla chips in the oven. Or serve with pita chips, toasted bread, or raw veggies.


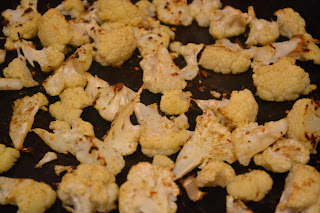
So, to make the dip, spray or lightly drizzle cauliflower with olive oil, season, and roast under high heat for at least 20 minutes until it starts to turn a nice brown color in some spots. After it's cooled a bit, blend in a food processor (or blender) with plain greek yogurt and lemon juice until smooth. Mix in additional seasonings and serve -- it's that easy! You'll need to season generously because both cauliflower and yogurt are rather plain on their own. Also, I found this dip tastes better when you take it out of the fridge for a while before serving so it can warm up a bit, but I didn't like it warmed in the microwave. Call me picky, but that's how it was best!


Going to a Super Bowl party tonight? This dip would certainly be a nice addition to the spread! But in case you're looking for even more inspiration, here's some recipes I've made in the past that you might consider. It's possible that one of these may end up being the topic of a future blog post, in which case you'll just have to pretend to be surprised ;) 

Homemade Dunkaroos


Roasted Cauliflower Yogurt Dip 

3/4 of a small/medium head of cauliflower
3/4 c yogurt
1 tbsp lemon juice
Olive oil
Cumin
Salt
Red pepper flakes
Curry powder
Garlic powder

Preheat oven to 450 degrees. Chop cauliflower into florets. Spray or lightly drizzle with olive oil. Sprinkle with salt, cumin, and red pepper flakes. Roast for 20 minutes. Remove and let cool slightly.

Mix cauliflower, yogurt, and lemon juice in food processor. Blend until smooth. Season with additional salt, red pepper flakes, cumin, curry powder, and garlic powder to taste.

Serve at room temperature.

Sunday, January 27, 2013

"Healthified" Chicken Fingers and Fries (with Garlic Mayo Aioli)

One of my favorite things to do when I cook is come up with sneaky little ways to make recipes healthier and more nutritious. This can mean adding in some cauliflower puree to mashed potatoes, using cottage cheese to create an alfredo sauce, making ice cream out of frozen bananas, or adding black bean puree to brownies (though I'll admit, that last one turned out pretty gross and I'm still in search of a tasty black bean brownie recipe so please share if you have one!). I get a weird satisfaction out of revealing the "secret" of these recipes to unsuspecting eaters. Although this particular recipe isn't as "out there" as some of the ones I've made in the past, I figured it was best to ease you guys into things... 


A few days ago, I had a craving for chicken fingers and so I decided to make a "healthified" version of the basic comfort meal of chicken fingers and fries. The chicken fingers are baked rather than fried, and the "fries" are actually parsnips! I don't know about you, but I hadn't previously eaten parsnips very often; in fact, I'm not sure I ever actually purchased one before. But sliced in the shape of a fry and baked in the oven under high heat, these babies were soft on the inside and slightly crispy on the outside, making them a great swap for potatoes with added nutrition. 

The key to the chicken fingers was to soak them in buttermilk. This makes them incredibly moist inside. I used dry buttermilk mix because it's easier than trying to use up a whole thing of buttermilk before it spoils. I cut the chicken into tender-sized pieces in the morning and let them soak in the buttermilk while I was at work. Because I'm indecisive, I decided to make two different kinds of chicken fingers. Both were breaded in panko (breadcrumbs would work too if you don't have any panko), but for half of them, I mixed in grated parmesan cheese and a variety of other seasonings to create an Italian flavor profile. For the other half, I mixed in shredded coconut and some spices for a "sweet and spicy" taste. 

After soaking the chicken, you'll dip each piece into the panko and spices mix
So many spices!
and place on a sprayed cookie sheet. Spray the chicken with olive oil using a Misto (or if you don't have one, just lightly drizzle it with olive oil or in a real pinch, spray with cooking spray; you need something on it though or it won't get crispy). Put into an oven preheated for 425 degrees. When the
Ready to take out of the oven
breading starts to get light brown and crispy, flip the chicken over and put it back into the over. Remove
when the other side is brown as well. I ended up baking them 7 minutes on the first side and 9 minutes on the other, but it will depend on the size of your tenders. To be safe, you can cut into one to make sure there's no pink inside. 


For the "fries," peel the parsnips and cut into the shape of fries, approximately four inches in length. Try your best to make them equal in size, especially in width. Because of the shape of my parsnips, some were thick on top and thin on the bottom, so they didn't all cook evenly. Next time, I'd shave more off of them
Here's what they look like when done
to make them uniform. You could always save any leftover pieces that don't make good fries to cook and puree or just eat raw. Anyway, place onto a sprayed cookie sheet and spray or lightly toss with olive oil. I used this recipe as a guide, so I seasoned mine with rosemary, garlic, cumin, salt and pepper, but if you don't care for those flavors, season as you please! I baked these for about 16 minutes until they started to brown on all sides, flipping them halfway through, but again, exactly cooking size will vary based on the size of your fries. Because I wanted to save time, I started these at 450 for a few minutes but then cheated and cooked them the rest of the way at 425 so I could put the chicken in at the same time, but if you're making them on their own, you'll want to stick to the higher heat so they get crispier.


I am a condiment fiend, so I served my chicken fingers and fries with ketchup, BBQ sauce, a coconut mango sauce, and a garlic mayo aioli. While many people find it revolting, I adore fries dipped in mayo, so personally, the aioli was my favorite sauce for the parsnips. I also preferred the ketchup with the Italian chicken fingers and the BBQ sauce with the coconut chicken. If you try the recipe, let me know your favorites! The recipes below make enough for 2 large or 3 moderate portions.


Baked Chicken Fingers

12-14 oz. boneless, skinless chicken breast
1 c. of buttermilk
Olive oil spray

For Italian seasoning: 
1/4 heaping c. panko
1 tbsp grated parmesean
Garlic powder, onion powder, red pepper flakes, parsley, oregano, salt, pepper to taste

For Coconut chicken: 
1/4 heaping c. panko
1 tbsp shredded coconut 
Garlic powder, chili powder, ginger, salt, red pepper flakes to taste

Cut the chicken breast into tender-sized pieces, approximately 1" x 4". Soak chicken tenders in buttermilk for at least an hour.  

Preheat oven to 425 degrees. Mix the panko and Italian spices in one bowl and the panko and coconut spices in another. If you choose to do all one type of chicken tender, double the measurements. 

Remove chicken from buttermilk and roll in the breading. Place onto a sprayed cookie sheet. Spray the chicken with olive oil. Place in the oven and bake for approximately 8 minutes. Flip and place back in the oven for another 8 minutes or until the chicken is light brown and crispy on both sides. 


Parsnip Fries   

5 parsnips, peeled
Olive oil spray
1.5-2 tbsp dried rosemary
Garlic powder, cumin, salt and pepper to taste 

Preheat the oven to 450 degrees. Chop the parsnips into the shape of fries, approximately 1/2" x 4" and place on sprayed cookie sheet. Spray with olive oil and sprinkle with spices. Bake for approximately 8 minutes, flip, and bake for another 8 minutes until they begin to brown. 


Garlic Mayo Aioli 
2 tbsp light mayo (don't use fat free) 
1 tsp lemon juice
Hefty sprinkle of garlic powder (or you can sub minced garlic)
Salt and pepper to taste

Mix and enjoy!

Friday, January 18, 2013

Spicy Charred Pepper Steak Sauce

I mentioned in my first post that I'd be using this blog to share both recipes I created on my own and my experiments testing out others' recipes. This recipe was based off of a recipe from SmittenKitchen, one of my very favorite food blogs. When the author of SmittenKitchen, Deb Perelman, came to DC two months ago on her cookbook tour, I went out to listen to her speak. Unfortunately (or fortunately for her) she is so popular that the place was filled to capacity and I never even caught a glimpse of her! Nonetheless, I was excited I got to hear the voice behind the blog posts that I anxiously await each and every time.

For quite some time now, I've had Deb's Charred Red Pepper Steak Sauce
recipe pinned on my "Recipes to Make- Savory" board (check it out if you want to be completely overwhelmed with delicious culinary options). However, I rarely cook red meat, and so it sat, neglected on my pinterest board. But, inspired by my new indoor grill I've already bragged about, I figured "Why not treat myself to a nice steak?".

While basically every SmittenKitchen recipe I've tried is perfect as is, I did make a handful of changes. For starters, I had a jar of hot cherry peppers my Dad gave me that I wasn't sure what to do with and thought this might be a good time to put them to use. Because of that, I decided I would go with a spicier flavor profile for the sauce, so I cut back a bit on the proportions for the molasses. Also, I didn't have any tomato paste on hand but I did have some tomato purée in a tube. While it wasn't nearly as much as the recipe called for, I figured I'd just end up with a stronger red pepper taste and that was fine by me.

I don't have a basis for comparison because I never tried making it exactly according to the recipe, but I'm not sure I ever will because this was so dang good! I started out just putting a spoonful on my steak and ended up adding about two more spoonfuls and using it atop both my side dishes as well...(don't judge). I could also see this being delicious on top of grilled chicken, a baked potato, or even as a spread on some toasted crusty bread. Luckily, even with my huge portion size, this makes about 3 servings so I still have some leftover in the fridge! The original recipe says it freezes well if you want to save some for later, but I don't think that'll be an issue for me ;)
 
Start by placing half a red bell with seeds and membranes removed on a cookie sheet and putting it under the broiler for about 10 minutes until it has developed a good char. Don't be afraid if it starts to get black - that's what gives it flavor! While that's in the oven, put all the rest of your ingredients in a food processor or blender. You'll note I only ended up using half a large hot cherry pepper after all. I wasn't sure what to expect from the peppers, so I gave them a taste before I just blindly threw a bunch in. Boy, am I glad I did - these babies are potent and hot! If you don't like spicy, you could just leave this ingredient out.

After you've removed the pepper from the oven and let it cool just a bit, add it to the food processor and puree everything into a sauce. Simmer the sauce over medium-low heat for about 15 minutes -- stirring occasionally -- while you prep the rest of your meal. I grilled up a nice steak seasoned simply with salt, pepper, and garlic powder so it didn't compete with the flavor of the steak sauce. I also sautéed some French-cut green beans and cooked some farro. If you haven't tried farro yet, you're in for a treat. I'll be talking much more about it in an upcoming blog post, so stay tuned!

Once everything is complete, spread a heaping portion of the sauce on your steak and you'll have yourself what looks and tastes like a 'special occasion meal' but is easy enough to throw together on a work night! As they say, "Beef. It's what's for dinner tonight."


Spicy Charred Pepper Steak Sauce

1/2 medium red bell pepper
1/2 large hot cherry pepper
1 TBSP tomato puree
2 TBSP orange juice 
1 TBSP Worcestershire sauce
1 TSP molasses
1 TSP olive oil
1/3 TSP salt
1/3 TSP ginger
1/2 TSP ground mustard
1/8 TSP pepper
1/8 TSP onion powder
1/8 TSP allspice  

Preheat oven on broil. Roast pepper on baking sheet until charred, approximately 10 minutes. 

Combine all other ingredients in a food processor or blender. Add red pepper. Puree until smooth. 

Simmer over medium-low heat for approximately 15 minutes, stirring occasionally. Serve and enjoy!