Tuesday, January 15, 2013

Stuffed Baked Apple

There are some mornings when you know your usual yogurt with granola or bowl of cereal and fruit is just not going to cut it. Mornings when you wake up and want something more, perhaps something of a treat! This recipe, my friends, is for those mornings.


In such situations, I usually turn to something savory like a veggie omelet or toasted bread topped with tomato and maybe even some smoked salmon, but not this time. This time I was craving something sweet, something comforting. And there's nothing more comforting than the smell of baked apples and cinnamon.


Take a medium sized apple of your choice (my favorite happens to be honeycrisp but anything will work; I used gala here) and core it, being careful not to go all the way through but far enough to remove all the seeds. 

Now mix together the filling. I love the combo of oatmeal and butterscotch chips and thought it'd pair nicely with some dried cranberries but you could also substitute raisins or throw in some chopped nuts if you please. Stuff the apple with the mixture and place the whole apple in a dish with some water at the bottom. I recently purchased these ramekins on post-Christmas clearance, and they happened to be the perfect size for one apple (not to mention that they coordinate perfectly with my red kitchen... can you tell I like the color red?). Now all that's left to do is stick it in your preheated oven and wait anxiously as the kitchen begins to smell oh so wonderful.
Cooking time will vary based on the size of your apple. You'll know it's done when you can pierce it with a fork. Mine took 36 minutes.


I made this recipe on the weekend but it could definitely be a weekday breakfast if you time it right. Get up and pop it in the oven (shouldn't take more than 5 minutes to prep), and then you have just enough time to do whatever you need to do to get ready for work while salivating in anticipation of your soon-to-be breakfast. To round out this meal, I paired the baked stuffed apple with a side of plain Greek yogurt mixed with some cranberry sauce I had in the fridge, a mug of hot tea, and of course had to throw in a slice of turkey bacon courtesy of my roommate ;) Or, even better, you could top this with some vanilla frozen yogurt and maybe even a smidge of whipped cream or butterscotch sauce and you've got yourself a decadent yet healthy dessert!


Stuffed Baked Apple

1 medium apple
2 tbsp oats
2 tsp butterscotch chips 
2 tsp dried cranberries
1 1/2 tsp maple syrup 
1 tsp lemon juice
¼ tsp vanilla extract
½ tsp cinnamon

Preheat your oven to 350 degrees. Core apple part-way through to remove seeds, creating a cavity approximately 1.5" in diameter. 

Mix oats, butterscotch chips, dried cranberries, maple syrup, lemon juice, vanilla extract, and cinnamon. Stuff mixture into the apple. 

Place apple into a dish with water at the bottom. Bake for approximately 35 minutes, or until a fork can easily pierce the apple.  
  

Sunday, January 13, 2013

Pretzel Brownie Bites

So before getting into the dessert recipe I'll be sharing with you all today, I just have to brag about the amazing brunch spread at my "picnic" this morning. They were calling for an unseasonably mild weekend in DC so I had coordinated to meet up with a friend from graduate school for a picnic to take advantage of the rare opportunity to be outdoors in January. Unfortunately, I woke up this morning to a foggy, drizzly, downright gross day. But not to be deterred, we decided to take our picnic inside. 

While looking out his large picture windows to simulate being outside, we feasted on fresh multigrain toast topped with avocado, tomatoes, piquillo peppers, sundried tomatoes, and amazing Dutch herbed cheese straight from Holland; greek yogurt with honey and fig spread; my apple pumpkin raisin oatmeal cookies (I'll have to share that recipe with you some other time!) topped with homemade chocolate hazelnut spread (a gift from another good friend from graduate school); mango, blueberries, grapefruit, clementines, and cherries; and dark chocolate covered pretzels, all washed down with some OJ and gingerbread chai tea. Mmmm! Outdoors or in -- we put together a great meal to start off our day! 

Anyway, on the recipe! This coming May, I have the honor of being a bridesmaid in the wedding of a good friend and former roommate. So last night a few of us got together to help with the wedding crafting. Here you can see the first stage of our efforts. 

But of course the night wouldn't have been complete without delicious food and a glass or two of her pink lemonade champagne punch. For my contribution, I wanted to bring a dessert but didn't have time to run to the store. Using just a few ingredients I already had on hand, I whipped up these pretzel brownie bites.


I'm big into the whole salty/sweet thing right now and just got a mini muffin tin for Christmas that I wanted to put to use; and so, a recipe was born. These pretzel brownie bites were tasty, especially because we topped them with a little Nutella and peanut butter. I will warn, the pretzel crust got a little soft the second day, so why not just eat them all the first day? ;) 


First, make a basic pretzel crust out of pretzels crumbs (crushed in the food processor), melted butter, and a little brown sugar. Press into each cavity of a sprayed mini cupcake pan. Bake in a 350 degree oven for a few minutes while you mix together boxed brownie mix and yogurt. Did you know: if you mix together 2 tbsp of brownie mix and 1 tbsp of vanilla yogurt and pop it in the microwave for about 30 seconds (or longer if you don't like your brownies gooey like I do), you get what must be the world's fastest dessert? Try it out sometime! 

Anyway, I didn't have vanilla yogurt; just plain greek yogurt in a gigantic tub -- always a staple in my refrigerator. So you'll see in the recipe below, I added a splash of vanilla and also a splash of almond milk to thin it out. However, you can certainly just use vanilla yogurt or if you prefer, make the batter the traditional way using eggs and oil.

Top each pretzel crust with a spoon of brownie mix and put them back in the oven. Take the pan out as soon as the center of each brownie bite has solidified, but keep a close eye on them so as to not end up with dry brownies since they continue to cook a little in the pan. I sprinkled mine with just a teeny bit of sea salt to intensify the salty/sweet dynamic. 

These bite size treats are perfect for popping in your mouth while busy crafting, but if you don't have a mini cupcake pan, you can just scale up the ingredients and make this in a regular-sized cupcake or cake pan. 


Pretzel Brownie Bites
Makes 24 mini brownies

30 pretzels (approx.; I had the square grid-looking kind); crushed
3.5 - 4 tbsp butter or butter spread, melted
1 tsp brown sugar
1 c. brownie mix
1/2 c. plain greek yogurt
Vanilla extract
Almond milk (or other milk)

Preheat oven to 350 degrees. Grind the pretzels into coarse crumbs using a food processor. Mix in melted butter and brown sugar. Scoop equal amount into each cavity and press down to create a crust (if it's not forming a crust, add more butter). Bake approximately 3-5 minutes until crust is solid (keep an eye on it to make sure they don't start to burn). 

Mix together brownie mix, yogurt, a splash of vanilla, and, if needed, enough milk to make the batter "spoonable." Top each pretzel crust with an equal amount of batter. Bake for approximately 8 minutes until center of brownie is no longer liquid. Let cool for a few minutes before removing from pan. 


Friday, January 11, 2013

Roasted Brussel Sprout and Onion Pizza with Feta and Bacon

One of my favorite easy meals is homemade pizza because the possibilities are endless! I've done thai chicken pizza, roasted veggie pizza, BLT pizza, pesto shrimp pizza... but tonight's topping might strike you as a little more unusual: brussel sprouts! That's right, the vegetable that most of us would have sworn we'd never eat at one point in our lives actually makes for an awesome pizza. Plus, how can you go wrong with cheese and bacon... 


I started out by slicing and roasting the brussel sprouts and onion. And here's where I made a bit of a "happy mistake." I seasoned the onion and a bunch of brussel sprouts with olive oil, balsamic vinegar, salt, and garlic but then I figured, while I'm at it, I might as well roast some more sprouts to have as leftovers for another time. This time, I decided to swap out the vinegar for sriracha. Well, when I went to top the pizza, the balsamic vinegar batch wasn't enough to cover the whole pizza so I ended up using both kinds. And hey, it was tasty! So I'll let it up to you. You can do all your brussel sprouts with balsamic vinegar, do half and half like me, or I assume you could just combine the vinegar and the sriracha as well. Let me know how it turns out if you try it a different way! 


Anyway, I stuck the brussel sprouts in a 450 degree oven for about 12 minutes. Meanwhile, I got the dough ready to go. I took a bit of a short cut and used store bought whole wheat pizza dough. This one happened to be from Wegmans, but I've also used Trader Joe's and Fresh Market's brands in the past. I prefer the kind that you spread out and bake yourself to the kind that's already cooked. Tip: room temperature dough will spread a lot easier than if it's straight out of the fridge. Use your hands to spread the dough to cover a cookie sheet. Then lightly drizzle or spray with olive oil and top with the parmesan cheese, garlic, a little salt, and roasted red pepper flakes. I put this in the oven for about 3 minutes while the veggies finished roasting. 

Next, top the pizza dough with the brussel sprouts and onions and put it back in the oven. The amount of time you'll need to bake varies based on the dough, so just keep an eye on it. Mine took about 8-10 minutes. Finally, I sprinkled the top with feta and bacon bits and popped it back in for another minute and voila! 


Dinner. is. served. 

Of course, I dipped mine in a little more sriracha. I warned you I like things spicy ;)

Roasted Brussel Sprout and Onion Pizza with Feta and Bacon

1 whole wheat pizza dough
30 brussel sprouts (approx.), quartered
1/2 large sweet onion, sliced
Olive oil
2-3 tsp balsamic vinegar
2-3 tsp sriracha
Salt
Garlic powder
Red pepper flakes
2/3 - 1 c. shredded parmesan cheese 
1/4 c. feta cheese 
2 tbsp crumbled bacon bits 


Preheat oven to 450 degrees. Chop the brussel sprouts and onion and toss with a drizzle of olive oil, balsamic vinegar, and sriracha (optional). Spread on a cookie sheet and sprinkle with garlic powder and salt to taste. Roast for approximately 12 minutes until sprouts begin to brown. 

Spray another cookie sheet with cooking spray. Use fingertips to spread dough. Lightly drizzle or spray with olive oil and sprinkle with parmesan cheese, garlic powder, salt, and red pepper flakes to taste. Bake for 3 minutes. 

Top dough with roasted sprouts and onion. Bake until dough is cooked all the way through, approximately 8-10 more minutes. Top with feta cheese and bacon bits and cook for another minute until cheese begins to melt. Slice and serve. 


Wednesday, January 9, 2013

Butternut Squash, Feta, and Spinach Salad

Here's a simple and tasty recipe that was inspired by my usual muse of "what do I have in my fridge that is about to go bad if I don't use it soon." Today, the answer was butternut squash. And honestly, I was pleasantly surprised by just how yummy this turned out to be! It's perfect for lunch, but could easily be bulked to make it dinner. 

  
Start out by chopping your butternut squash. I cut it pretty small so it would cook quickly and get a lot of that caramelization on the outside that makes it oh so tasty. I just put mine on aluminum foil so there's no clean up after. Next, season your butternut squash. Lightly coat with olive oil (I used my misto) and sprinkle with garlic powder, chili powder, cumin (one of my favorite spices for things like squash, pumpkin, sweet potatoes, eggplant, etc.), and salt and pepper. Then toss it in the oven to roast. I love the flavor that vegetables develop when roasted. Tomatoes = yum. Roasted tomatoes = banging. Red pepper = mmm. Roasted red pepper = amazing. You get the picture. 


before


after
While the squash was roasting, I put together the salad. A few handfuls of spinach made up the base. I topped this with a splash of balsamic vinaigrette, but you could use any vinaigrette you prefer. Dress lightly since you're going to be adding so many flavorful toppings. Next, I sliced and sauteed some onions and tossed those on there. In addition, I used feta, golden raisins, and sunflower seeds, but feel free to tweak as you please. You could use goat cheese instead of feta, dried cranberries or pomegranate seeds instead of raisins, or pepitas instead of sunflower seeds. Also, if you want to make this a heartier meal, throw on some cooked quinoa, farro, or another grain. Don't you love adaptable recipes? 

Once your squash is done roasting (it should be soft enough to easily insert your fork and beginning to get brown on the edges), throw it on top and enjoy!  


Butternut Squash, Feta, and Spinach Salad

1 - 1 1/2 c. butternut squash, cut into 3/4" cubes
Olive oil
Salt
Pepper
Garlic powder
Chili powder
Cumin 
2 cups fresh spinach
1 1/2 tsp of vinaigrette dressing
1/4 c. sliced onion
1 1/2 tbsp feta crumbles
1 tbsp golden raisins
1 tbsp sunflower seeds

(With this recipe, measurements are just a rough guide; feel free to use as little or as much as you please!) 

Lightly drizzle or spray the squash with olive oil and sprinkle with the spices. Roast in a 450 degree oven for approximately 20 minutes. 

Sauté (or just microwave if you're short on time) the onion until it begins to become translucent.

Plate the spinach and lightly top with dressing. Top with feta, raisins, sunflower seeds, onion, and roasted butternut squash.

Tuesday, January 8, 2013

My new blog! And Grilled Tilapia with Fiesta Quinoa

Hi Everyone! Thanks for stopping by my brand spanking new foodie blog! Those of you who know me well know that over the last few years, I've gotten really into cooking. I'm constantly trying out new recipes and sharing pictures with my friends via text, instagram, pinterest, etc. So I figured I might as well take the plunge and just start a food blog of my own! 

I plan on using this blog to share the results of my cooking adventures -- both based on others' recipes and ones I make up. I'll also occasionally have guest posts (I have a lot of friends who like cooking too!) and posts about restaurants and food products I try out. I have a fun new recipe to share with you all today, but first just a few things you should know about me and my cooking: 


1) Since I'm "single in the city," a lot of my recipes will just portioned be for one (which is not an easy task sometimes!). But you can always double or even quadruple to fit your needs!


2) I like things flavorful and often times, that means spicy! But I'll always try to note when I think something is too spicy for most palates and would need some adjusting. 


3) Just like I'm not a professional cook, I'm not a professional photographer either, but I'm decent at both and will do my best to document the process. That being said, I'll be the first to admit, my plating would
not cut it on "Chopped." 

4) I'm really excited about sharing my efforts with all of you. Please feel free to comment if you have questions, comments, suggestions or if you try out the recipes! 


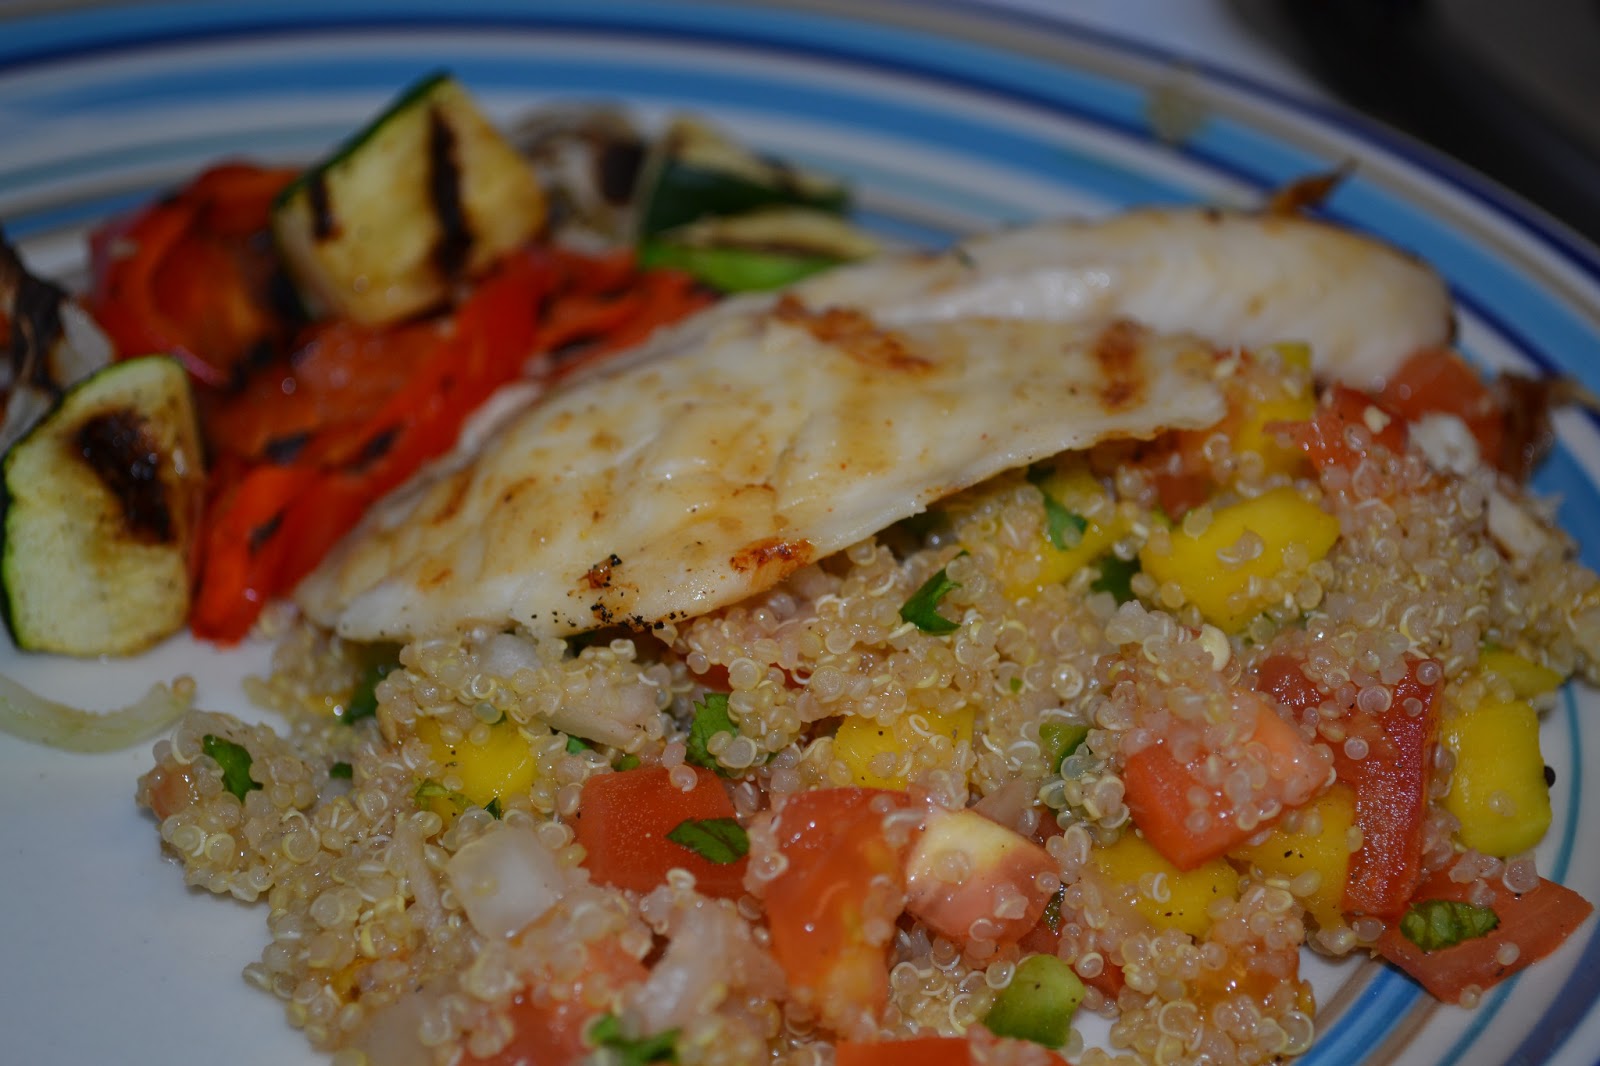
Ok so on to the recipe! Tonight I made grilled tilapia over what I'm calling  "fiesta quinoa" and a side of grilled veggies.  Although this is a light, almost summery dish that might be considered inappropriate for the month of January,
I got an indoor grill for Christmas and have been so excited to try it out. Plus, I had all the ingredients already on hand -- love when that happens!

I definitely think this recipe was a success; the only trouble was timing everything to be done at the same time, but isn't that always the problem... I started out by cooking some quinoa on the stove and grilling some veggies (onions, red pepper, zucchini) to have as a side. If you don't have an indoor grill, I'm sure a foreman or even a saute pan would work just as well. 


Then I made the mango salsa to mix in with the quinoa. I intended for there to be some leftover salsa for another time but ended up eating it all -- it was good :) 


Lastly, I grilled a tilapia filet for putting on top of the "fiesta quinoa." I simply put just a bit of salt and pepper on the tilapia and brushed both sides with a coconut mango grilling sauce I had on hand. Unfortunately I don't have the recipe for that but I'm sure you can find something similar, especially at a specialty store. Here's what I used: 


And here was the final result:


I hope you enjoy!  


Grilled Tilapia with Fiesta Quinoa 

1 tilapia filet (approximately 4 oz)
1 tsp of mango coconut (or other similar) grilling sauce
1/4 c quinoa
1/2 c tomato, chopped
1/4 c mango, chopped
2 tbsp onion, chopped
1.5 tbsp cilantro, finely chopped
1 tsp of lime juice
1 tsp of jalapeno, finely chopped (seeds and membranes removed if you don't have high spicy tolerance like me)
Splash of hot sauce (optional)
Salt and pepper to taste
Assorted cut veggies 
  

Cook quinoa according the directions on the package.  

Combine tomato, mango, onion, cilantro, lime juice, jalapeno, and hot sauce, salt and pepper to taste. Set aside. 

Season the cut veggies with salt and pepper and grill for approximately 8-10 minutes (or until cooked to your preference).

Sprinkle tilapia with salt and pepper if desired. Brush with grilling sauce. Grill on each side for approximately 3 minutes each. 

Combine quinoa and desired amount of the mango salsa (all of it if you please!) and top with the grilled tilapia. Serve with the side of grilled veggies.